
What to wear for a business headshot? This seemingly simple question holds significant weight. Your professional headshot is often the first impression you make, influencing how clients, colleagues, and potential employers perceive you. From choosing the right outfit and colors to mastering grooming and posing, every detail contributes to a polished and professional image. This guide provides a comprehensive approach, helping you select the perfect attire, style your hair and makeup appropriately, and understand the importance of background and posing to create a headshot that truly reflects your professional brand.
We’ll explore appropriate attire for various industries, offering examples of suitable and unsuitable clothing choices. We’ll also delve into the nuances of color psychology, showcasing how different hues can impact your overall image. Beyond clothing, we’ll cover essential grooming tips, posing techniques, and background considerations, ultimately empowering you to create a headshot that projects confidence and competence.
Clothing Choices for a Professional Headshot: What To Wear For A Business Headshot
A professional headshot is a crucial element of your personal brand, often the first visual impression you make on potential clients, employers, or collaborators. Choosing the right attire is therefore paramount to projecting the image you desire and aligning with your industry and professional goals. The clothing you select significantly impacts the overall perception of your competence, credibility, and personality.
Appropriate Attire for Various Business Sectors, What to wear for a business headshot
Different industries have varying dress codes, and your headshot should reflect this. A finance professional will typically require a more formal look than someone in the tech industry, for example. Understanding these nuances is key to creating a headshot that resonates with your target audience. For instance, a finance professional might opt for a tailored suit, while a tech entrepreneur might choose a more polished but less formal outfit, like a button-down shirt and blazer. Creative professionals often have more leeway, but even then, a cohesive and professional look is vital.
The Impact of Color Choices on Overall Impression
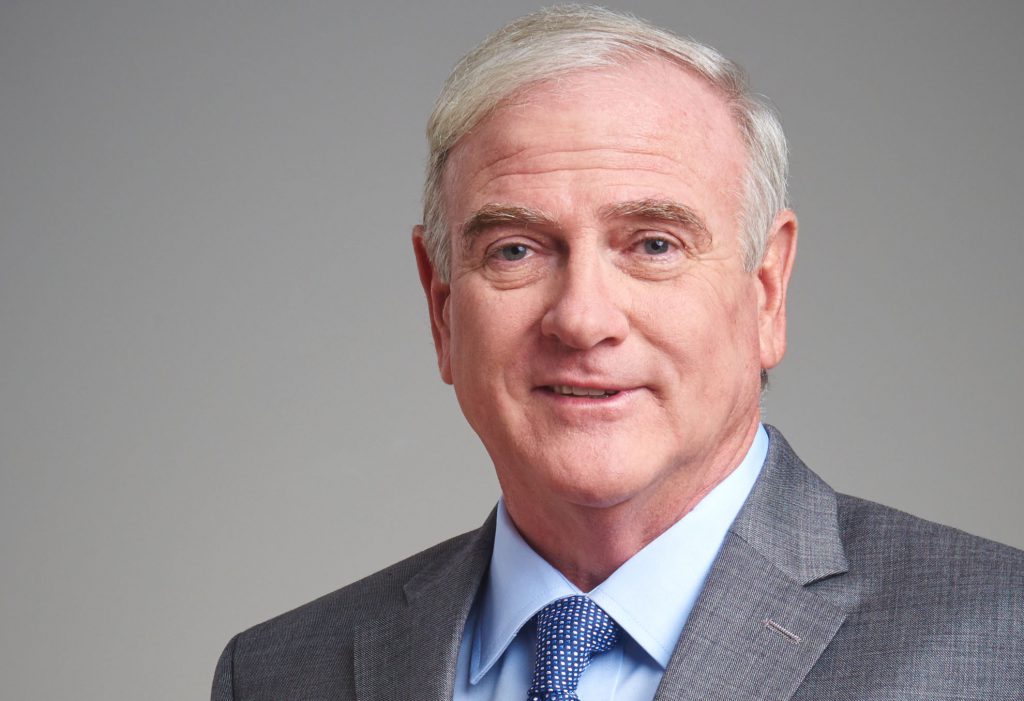
Color psychology plays a significant role in how your headshot is perceived. Darker colors like navy blue or charcoal gray often convey authority and professionalism, while lighter colors such as light blue or pastel shades can project approachability and creativity. However, the choice should complement your complexion and the overall mood you wish to create. Avoid wearing bright, distracting colors that might draw attention away from your face. Neutral tones generally work best as they allow your facial features to remain the focal point.
Examples of Suitable and Unsuitable Clothing Items
Suitable clothing items for a professional headshot generally include well-fitting, wrinkle-free clothing. A tailored suit or blazer, a crisp button-down shirt or blouse, and professional trousers or a skirt are all excellent choices. The fit should be flattering but not overly tight or loose. Avoid anything too trendy or casual, such as graphic tees, jeans (unless specifically styled for a very casual industry), or clothing with distracting logos or patterns. Unsuitable clothing choices include anything wrinkled, stained, or showing signs of wear. Avoid clothing that is too revealing, overly casual, or doesn’t fit properly. The focus should always be on presenting a polished and professional image.
Outfit Options for Different Levels of Formality
| Level of Formality | Top | Bottom | Additional Notes |
|---|---|---|---|
| Formal | Tailored suit jacket and blouse/shirt | Tailored trousers or skirt | Consider a neutral color palette; ensure the fit is impeccable. |
| Business Casual | Button-down shirt or blouse, blazer (optional) | Dress pants or a skirt | Avoid overly casual fabrics like linen; opt for neat and professional styles. |
| Casual | Well-fitting sweater or collared shirt | Dark-wash jeans (if appropriate for the industry) or dress pants | Ensure the outfit is still polished and professional; avoid overly distressed or casual styles. |
Styling and Grooming Considerations

A polished appearance is crucial for a professional headshot. Your styling and grooming choices directly impact the overall impression your image conveys, influencing how potential clients, employers, or collaborators perceive you. Careful attention to detail in these areas can significantly enhance the effectiveness of your headshot.
Hair Styling for Professional Headshots
Hair should be styled neatly and professionally. Avoid overly elaborate styles that might distract from your face. For men, this might mean a clean, well-groomed cut and style that complements their facial features. Women might opt for a sleek updo, a polished blow-dry, or a style that is neatly arranged and avoids loose strands obscuring the face. The key is to choose a style that feels natural and reflects your professional persona. Consider consulting a stylist for a professional opinion on a style that best suits your face shape and overall look. The goal is to create a polished and cohesive appearance that projects confidence and competence.
Makeup Application Techniques for Headshots
Makeup, for women, should be natural-looking and enhance features, not mask them. Avoid heavy makeup, shimmery products, or trends that might appear dated in a few years. Focus on even skin tone, defined brows, and a touch of mascara and lip color. A professional makeup artist can provide expert guidance and ensure a polished, camera-ready look. For men, consider using a light foundation or concealer to even out skin tone, and a touch of grooming products to keep hair and facial hair neatly in place. The aim is to present a clean, well-groomed appearance that complements the overall professional image.
Appropriate Accessory Choices for Professional Headshots
Accessories should be minimal and professional. Avoid anything that might be distracting or take away from your face. A simple necklace, a classic watch, or subtle earrings can add a touch of personality without being overwhelming. Large, bold jewelry or flashy accessories should be avoided. The focus should remain on you and your professional image, not on your accessories. If you wear glasses, ensure they are clean and well-maintained, and that the frames complement your face shape.
Significance of Well-Maintained Hands and Nails
Clean and well-maintained hands and nails are often overlooked but crucial. Chipped nail polish, ragged cuticles, or excessively long nails can be distracting and detract from the overall professionalism of the headshot. Ensure your nails are neatly trimmed and manicured, with a neutral or subtle polish if desired. This detail speaks volumes about your attention to detail and overall presentation. Consider a simple, classic manicure a day or two before the shoot to ensure a polished look.
Step-by-Step Headshot Preparation Guide
Preparing for a professional headshot involves several key steps to ensure a polished and successful outcome. Here’s a suggested approach:
- Plan Your Outfit: Choose an outfit that is professional, comfortable, and reflects your personal brand. Consider the industry you work in and the overall image you want to project.
- Hair and Makeup Preparation: Wash and condition your hair, allowing it to dry naturally or styling it as desired. Apply makeup (if applicable) using natural-looking techniques. Avoid heavy makeup or shimmery products.
- Nail Care: Ensure your nails are neatly trimmed, clean, and manicured. Apply a neutral or subtle nail polish, if desired.
- Accessorize Minimally: Select minimal and professional accessories, such as a simple necklace or watch. Avoid anything distracting or flashy.
- Grooming Details: Pay attention to details such as clean and trimmed facial hair (if applicable), clean teeth, and well-moisturized skin.
- Relax and Be Yourself: Try to relax and be yourself during the photoshoot. A natural and confident expression will translate well in the final image.
Background and Setting Suggestions
The background of your business headshot significantly impacts the overall perception of professionalism. A well-chosen backdrop complements your attire and expression, creating a cohesive and impactful image. Conversely, an unsuitable background can distract from you, undermining the professionalism you aim to convey. Careful consideration of background elements is crucial for a successful headshot.
The background should be uncluttered and free of distracting elements. It should provide a neutral and professional context, allowing the viewer to focus on you. The background’s color and texture should also be considered, as they can influence the overall mood and tone of the photograph. Avoid busy patterns, harsh colors, and anything that might date the image quickly.
Suitable and Unsuitable Background Examples
Suitable backgrounds generally feature solid, neutral colors or subtly textured surfaces. A plain white or light grey wall is a classic and versatile choice, providing a clean and professional look. A subtly textured backdrop, such as a lightly patterned wallpaper or a textured fabric, can add visual interest without being distracting. Outdoor settings can work, but require careful consideration of lighting and the surrounding environment; a well-maintained garden with soft, diffused light can be effective.
Unsuitable backgrounds often include cluttered spaces, distracting patterns, or visually jarring elements. A busy office environment with papers scattered on the desk, a wall with bright artwork, or a background with strong lines or shapes can detract from the subject. Similarly, backgrounds that are too dark or too bright can create poor contrast and affect the overall quality of the image. Avoid using backgrounds with strong, distracting colors or patterns that clash with your clothing.
Background Options Table
| Setting | Style | Description | Example |
|---|---|---|---|
| Studio | Solid Color | A plain backdrop, typically white, grey, or a muted tone, providing a clean and classic look. | Imagine a simple, evenly lit grey backdrop, providing a neutral and uncluttered setting. |
| Office | Minimalist | A simple, uncluttered office space, perhaps with a plain wall and minimal furniture visible. | A shot taken against a plain wall in a modern office, with only a hint of a desk or bookshelf visible in the background. |
| Outdoor | Natural | A natural setting with soft, diffused light; consider a garden or a park with a muted background. | Picture a softly lit garden with blurred greenery in the background, providing a natural and calming feel. Avoid harsh sunlight or distracting elements. |
| Home Office | Neutral | A home office setup with a plain wall and minimal distractions; ensure the space is tidy and well-lit. | A shot taken against a neutral-colored wall in a home office, with only a minimal amount of furniture visible, ensuring the focus remains on the subject. |
Lighting’s Impact on Headshot Quality
Lighting is paramount in determining the mood and quality of a headshot. Harsh, direct lighting creates strong shadows and can wash out details, leading to an unflattering image. Soft, diffused lighting, on the other hand, creates a more even and flattering illumination, minimizing harsh shadows and highlighting the subject’s features. The direction of light also affects the overall mood; side lighting can create a more dramatic effect, while front lighting provides a more natural and approachable look. Consistent and even lighting is key to a professional-looking headshot. Natural light, when properly diffused, is often preferred for its soft and flattering quality. However, professional studio lighting provides more control and consistency.
Posing and Expression Guidance
A successful business headshot conveys professionalism, approachability, and confidence. Achieving this requires careful attention to posing and facial expression, complementing the already considered aspects of clothing and setting. The right pose and expression can significantly impact the overall impression your headshot makes on potential clients, employers, or collaborators.
The goal is to project a natural and authentic image, avoiding stiffness or forced smiles. This involves understanding how posture and eye contact contribute to the overall impression, and mastering techniques for conveying the right level of professionalism and approachability through subtle facial expressions.
Posture and Eye Contact
Maintaining good posture is crucial for projecting confidence and professionalism. Stand tall with your shoulders relaxed and back straight, but avoid appearing rigid. A slight lean forward can create a more engaging and approachable image. Your head should be held high, chin slightly elevated to avoid a double chin. Avoid slouching or hunching, as this can make you appear less confident and less engaged. Regarding eye contact, direct your gaze slightly towards the camera lens. This creates a connection with the viewer and conveys sincerity and trustworthiness. Avoid looking directly down or up, as this can detract from the overall image. A natural, confident gaze is key to a compelling headshot.
Facial Expression
Your facial expression is arguably the most important aspect of your business headshot. It’s the first thing people notice and often dictates the overall impression. Aim for a friendly, approachable expression that also projects competence and professionalism. A genuine smile is usually a good choice, but it should be natural and not forced or overly wide. Practice your smile in a mirror to find a look that feels comfortable and authentic. Avoid expressions that are too serious or stern, as this can make you appear unapproachable. Similarly, avoid expressions that are too casual or informal, as this may detract from the professional image you wish to project. The ideal expression should be a balanced blend of confidence, approachability, and professionalism.
Effective Poses for Business Headshots
The pose you choose can significantly impact the overall success of your headshot. Consider the following options, each offering a different feel and conveying different aspects of your personality and professionalism.
- The Classic Straight-On Pose: This is a timeless and versatile option. Stand directly facing the camera, shoulders relaxed, and maintain good eye contact. This pose projects confidence and authority. It’s suitable for a wide range of professions and industries.
- The Slight Turn Pose: Turn your body slightly to one side, with your shoulders relaxed and your head turned towards the camera. This pose is more dynamic and less formal than the straight-on pose. It can create a more engaging and approachable image.
- The Hands-in-Pockets Pose (for more casual settings): This pose can convey a relaxed yet confident demeanor. However, ensure the pose feels natural and avoids appearing sloppy. It’s best suited for more informal business contexts.
- The Leaning Pose (against a wall or desk): Leaning slightly against a wall or desk can create a more relaxed and approachable feel. This pose works well if you want to appear less formal and more approachable. Ensure your posture remains good, even when leaning.
- The Over-the-Shoulder Pose: This pose, where you look back over your shoulder at the camera, is best used sparingly and in appropriate contexts. It can be dynamic but should be executed carefully to avoid looking awkward.
Remember, the most effective pose will depend on your individual personality and the overall message you want to convey. Experiment with different poses and expressions to find what works best for you. It is often beneficial to work with a professional photographer who can provide guidance and feedback.
Image Preparation and Enhancement

A high-quality headshot is crucial for making a strong first impression. While clothing and posing contribute significantly, the final polish comes from proper image preparation and enhancement. This stage ensures your headshot is crisp, clear, and professionally presented, reflecting your best self. Ignoring this step can significantly diminish the impact of your investment in professional photography.
Image resolution and quality are paramount. A low-resolution image will appear pixelated and blurry, especially when viewed on larger screens or printed. High resolution allows for resizing without significant loss of quality, ensuring your image looks sharp across various platforms, from online profiles to printed marketing materials. Aim for a resolution suitable for both digital and print use. Professional photographers typically deliver high-resolution files, but it’s always wise to confirm this.
Professional Image Editing Benefits
Professional image editing goes beyond simple cropping and resizing. It leverages advanced techniques to subtly enhance your appearance, correct imperfections, and create a polished, consistent look. This can include skin retouching, color correction, and background adjustments, all performed with a natural-looking result that avoids an artificial or overly processed appearance. The result is a headshot that truly reflects your professional image while presenting the best version of yourself. Amateur editing, in contrast, often results in unnatural-looking enhancements that can detract from the overall professionalism.
Common Image Editing Techniques
Several techniques are commonly employed to enhance headshots without sacrificing naturalness. These include:
Skin Retouching: Subtle skin smoothing removes minor blemishes and imperfections, creating a more even complexion without masking your natural features. This is crucial to achieving a professional and polished look, not to make someone appear unrealistic.
Color Correction: Adjusting the white balance and color saturation ensures consistent and accurate color representation, preventing your skin tone from appearing washed out or overly saturated. This is especially important for ensuring consistency across different devices and displays.
Background Enhancement: Cleaning up the background removes distracting elements and creates a clean, uncluttered setting. This might involve removing minor blemishes or inconsistencies in the background or subtly improving the lighting and contrast of the backdrop.
Lighting Adjustments: Subtle adjustments to brightness, contrast, and shadows can enhance facial features and create a more balanced and flattering illumination. This aims to improve the overall look without changing the subject’s appearance significantly.
Before-and-After Image Edit Examples
Consider these hypothetical examples to illustrate the impact of professional image editing:
Example 1: Skin Retouching
Before: The image shows a few minor blemishes and uneven skin tone. The subject’s overall appearance is slightly rough and less polished.
The skin shows a few small blemishes and uneven texture, resulting in a slightly less polished look. The color is also a bit inconsistent.
After: The blemishes have been subtly removed, and the skin tone is now even and smooth. The subject’s complexion appears healthier and more radiant, enhancing their overall professional image without looking artificial. The original skin texture is still visible.
The blemishes are reduced, creating a smoother, more even complexion. The color consistency has been improved, resulting in a healthier and more polished appearance.
Example 2: Background Enhancement
Before: The background contains a distracting element – a slightly wrinkled curtain behind the subject’s shoulder. This draws the eye away from the subject.
The background shows a slightly wrinkled curtain that is distracting and detracts from the subject’s focus.
After: The wrinkled curtain has been digitally removed or smoothed out, resulting in a cleaner, more professional-looking background that keeps the focus entirely on the subject. The background is now a neutral and uncluttered backdrop.
The background is now clean and uncluttered, with the distracting curtain removed, improving the overall professional look of the image and keeping the attention on the subject.


